Shibori Napkin DIY ... it's easy I PROMISE!
Shibori is a Japanese form of dyeing fabric that consists of binding and folding fabric to create amazing patterns. It's usually done with indigo dye, but I had a vision of deep purple napkins for my tablescape, so I veered a little bit away from the norm. Regardless of the color....the results are GORGEOUS! There are endless ways to fold and bind the fabric, but I used a very simple and straightforward method. Here is what you will need :
* fabric dye or an indigo dye kit - found at all major craft stores.* cloth napkins - preferably made of natural fibers -- these will absorb the dye best* rubber gloves* cardboard* rubber bands or twine/string* scissors * bucket or large bowl
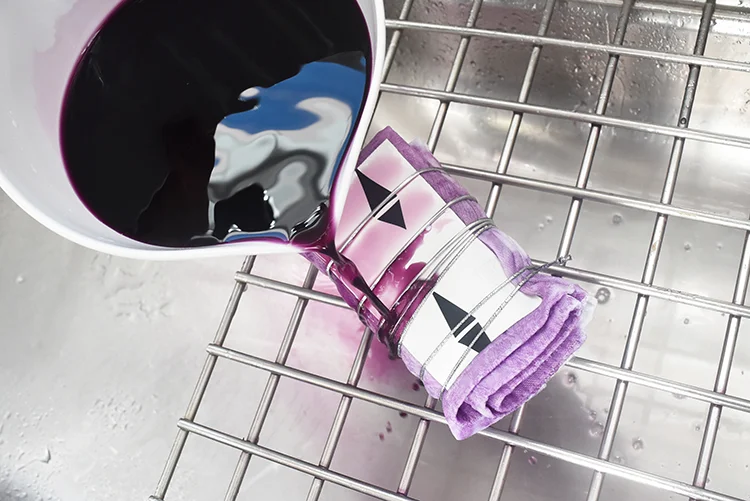
I started by folding each napkin into a small rectangular shape, using an accordion method. First, lay the napkin flat on your work surface. Fold the napkin in half. And then in half again. And then in half a third time, so you have a skinny napkin fold. Next, you will pleat the napkin in the opposite direction, alternating which way you fold. You should end up with this at the end : Next, cut two cardboard pieces out, roughly the size of the flat folded side of the napkin. You can use any cardboard you have, I happened to use a paper plate because that is all I had at the moment! Place a rectangle at each end of the folded napkin. And wrap the bundle with rubber bands or twine/string. Now it's time for the fun stuff ! Mix the dye according to the package directions. I was only dyeing 8 napkins and didn't want to waste my whole bottle of dye, so I made up a small batch in a plastic bowl instead of using a large bucket. To avoid making a huge mess, I actually did my dyeing right in the sink!! For big jobs, I would probably take this project out on the grass so nothing in your house gets accidentally dyed. Take each napkin bundle, wet it with water (so the dye absorbs better) and then pour the dye all over it, covering both sides. You can repeat this step depending on how rich you would like the color to be. Once you are done, you will wrap your napkin bundle in cellophane and leave it overnight to dry. After a good 24 hours, you can unwrap and behold the beauty !! You can experiment with several different shapes of cardboard like triangles or squares. Or even just using rubber bands to bunch around the fabric. It's all about creating the negative and positive space. These turned out perfectly for my upcoming table scape!
xoxo, Michelle


