
Ready, Set, Weekend with the Garden of Eatin'


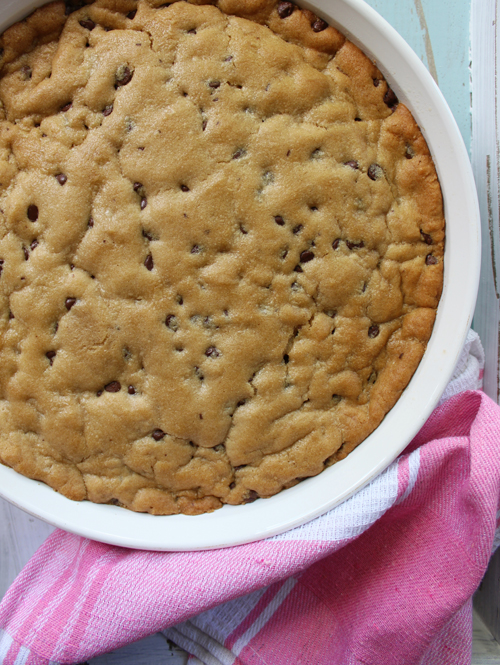

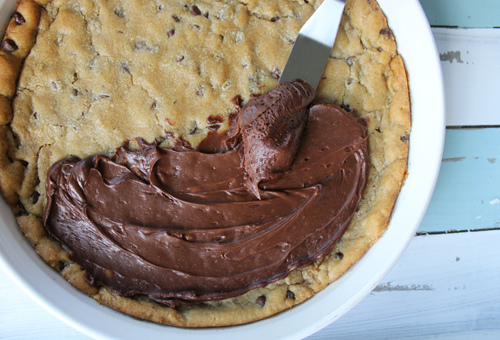


Please brace yourselves...I have not been giving intros to Aunt Debi's weekly LMP Columns but I just had to shout it out for this one because really...this is beyond FABULOUS! Easy as it is delicious and absolutely stunning. I know because I got to devour this bad boy at our dinner for Thanksgiving in Toronto last week. ENJOY! Halloween is just around the corner and you know what that means? Oodles and oodles of mini candies laying around the house just begging to be eaten. Before I tell you how to make an unbelievably easy dessert with all the LEFTOVER candy your kids have collected, let me give you a bit of history on Halloween in my home. When my kids were small, I sent them packing with king size pillow cases door to door to collect the goods. When they returned, the contents inside the pillow case were dumped onto the family room floor for inspection. Inspection was always conducted by YOURS TRULY to ensure the following criteria: A. There was nothing sketchy looking inside the bag ( i.e. apples, homemade foods & razor blades) B. There were no tampered boxes or unwrapped candies floating around in the pile C. There were enough boxes of Kit Kats & Snickers bars to satisfy MY needs for at least a week D. There were at least 5 Twizzler packs to ONCE AGAIN satisfy MY needs for at least a week E. There were at least 6 mini boxes of Smarties with the same rules above Once all of MY selected goods were segregated from the pile of crap on the floor, it was a “free for all” for the next few days. Keeping in mind I had 3 boys with animal appetites, the majority of candy was GONE in 60 seconds. If you are lucky enough to hide a few treats and have leftover candy from the evening, this recipe is for you. I’m going to give you two versions and depending on how much of a hurry you are in, choose the one that suits your needs. They are both so easy it’s actually stupid not to make it. RECIPE #1: Take a ready-made roll of chocolate chip cookie dough (or your favorite chocolate chip cookie recipe) and press it into a round cake pan or cast iron skillet. Bake it at 350F for 20 - 25 minutes (checking to make sure it is just browned on top). Cool cookie completely and spread Nutella or ready-made chocolate icing over it like a MOCK pizza sauce. Now grab your candies and GO wild. You can divide it up in sections as you wish, like pizza slices, or just cover the whole darn thing. RECIPE #2: * 1 (15.25 oz) yellow cake mix, unprepared * 1/2 cup canola oil * 2 eggs * 1 cup semi sweet chocolate chips * Nutella to spread as frosting OR chocolate frosting (store bought or your own homemade frosting * Up to 8 different toppings of your choice (I used a mix of goodies from the local bulk food store) 1. Preheat your oven to 350 degrees F. In a medium mixing bowl combine the dry cake mix, oil and eggs. Mix until combined. Fold in the chocolate chips. 2. Spray two 8 or 9 inch round baking pans with non-stick cooking spray. Using the palms of your hands spread the dough evenly throughout the pan. Bake for 10-15 minutes. Do not over-bake. 3. Let the cookie cool completely. 4. When the cookie is completely cooled, spread Nutella or frosting on top. (If you don’t like chocolate you can use whatever kind of frosting you like!) 5. Using a butter knife, lightly score the surface of the frosting and divide it into 8 equal pieces. (In half, half again and half again). 6. Sprinkle your desired toppings evenly into each 8th of the cookie pizza. 7. Slice and serve! I mean really……..is this not beyond? See ya next week! XOXO debi @thegardenofeatin